Minicom is a powerful serial communication program for Linux that enables users to connect to remote serial devices, routers, embedded systems, and industrial equipment. If you are working with USB-to-serial adapters, RS-232 devices, or debugging embedded systems, Minicom on Linux is an essential tool. This guide will walk you through what Minicom is, how it works, how to install Minicom on Linux/Ubuntu, configure it, and troubleshoot common issues.
What is Minicom?
Minicom is an open-source serial terminal emulator for Linux, similar to HyperTerminal on Windows. It enables users to communicate with serial devices via COM ports or USB-to-serial adapters. Minicom supports various baud rates, flow control options, and logging features, making it an indispensable tool for system administrators and developers.
Key Features of Minicom
- Supports multiple baud rates for serial communication.
- Configurable flow control options (hardware/software).
- Logging capabilities for debugging.
- Xmodem, Ymodem, and Zmodem support for file transfers.
- Easy-to-use text-based interface.
How Minicom Works
Minicom interacts with serial devices using Linux’s TTY interface, allowing data transmission and reception over a COM port. When a USB-to-serial adapter is connected, Linux assigns it a device name such as /dev/ttyUSB0 or /dev/ttyS0. Minicom then opens this port, enabling users to send and receive data over the serial connection.
How to Install Minicom on Linux / Ubuntu
Installing Minicom on Ubuntu/Debian
To install Minicom on Ubuntu or Debian-based distributions, follow these steps:
sudo apt update
sudo apt install minicom -y
After installation, verify Minicom is installed by running:
minicom -h
Installing Minicom on Fedora
For Fedora users, install Minicom with:
sudo dnf install minicom -y
Installing Minicom on Arch Linux
For Arch-based distributions, use the following command:
sudo pacman -S minicom
Once installed, Minicom is ready for configuration and use.
How to Configure Minicom on Linux
Before using Minicom, it must be configured to communicate with the correct serial device.
Step 1: Identify the Serial Port
To determine the port assigned to your USB-to-serial adapter, run:
dmesg | grep tty
This will display output similar to:
[ 1234.56789] usb 1-1: pl2303 converter now attached to ttyUSB0
Here, /dev/ttyUSB0 is the serial port assigned to the adapter.
Step 2: Launch Minicom in Setup Mode
To configure Minicom:
sudo minicom -s
This opens the configuration menu. Navigate to Serial port setup and modify the following settings:
- Serial Device:
/dev/ttyUSB0or/dev/ttyS0 - Baud Rate: 115200 (or as required by your device)
- Flow Control: None or Hardware (depending on your device)
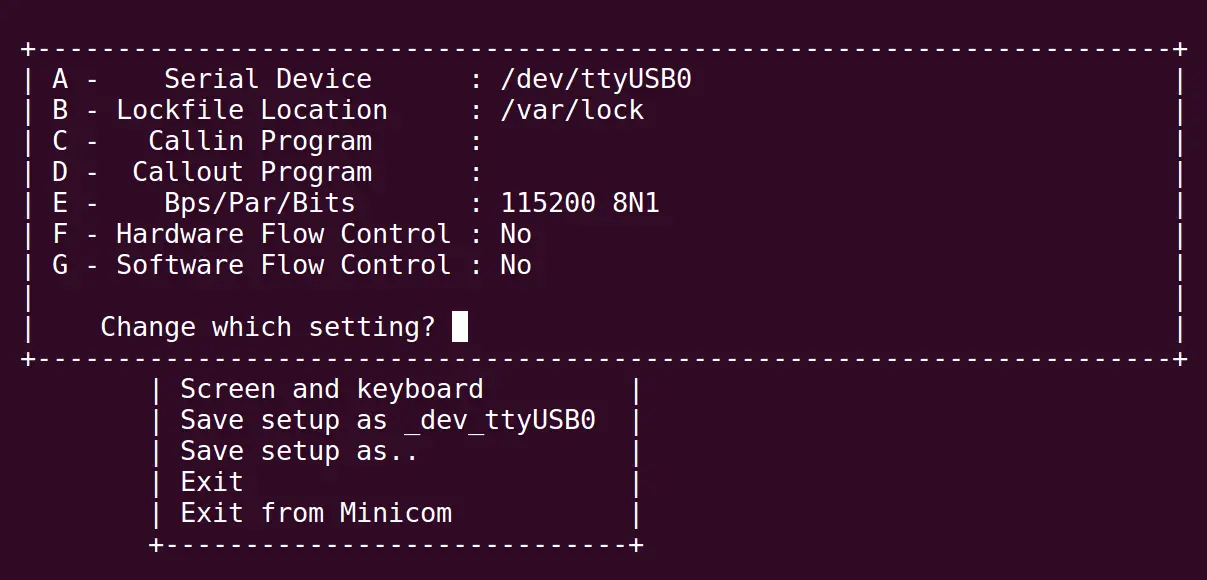
Save the configuration and exit.
Step 3: Run Minicom with Serial Device
After setup, start Minicom with:
minicom -D /dev/ttyUSB0 -b 115200
This will establish a serial connection, allowing interaction with the connected device.
Common Issues and Solutions
1. Minicom Permission Denied Error
If Minicom shows Permission Denied, add your user to the dialout group:
sudo usermod -aG dialout $USER
Log out and back in for changes to take effect.
2. Minicom Cannot Open /dev/ttyUSB0
Ensure the device is connected and check its status with:
ls -l /dev/ttyUSB0
If the device exists but is inaccessible, set proper permissions:
sudo chmod 666 /dev/ttyUSB0
3. Garbled Output in Minicom
Incorrect baud rate can cause garbled output. Set the correct baud rate using:
minicom -D /dev/ttyUSB0 -b 115200
Installing and configuring Minicom on Linux / Ubuntu is straightforward, and once set up, it serves as an invaluable tool for serial communication, debugging embedded systems, and configuring network devices. Whether you’re an IT professional or an electronics enthusiast, learning how to install Minicom on Linux and use it effectively will make serial communication effortless.