For enabling Serial console on RPi, so that we can get serial console on RPi, we bought cable from Amazon link “USB to TTL Serial Cable – Debug / Console Cable for Raspberry Pi” [ https://www.amazon.in/xcluma-Debugger-Raspberry-Beaglebone-Cubietruck/dp/B072TDMJW3?tag=googinhydr18418-21 ]
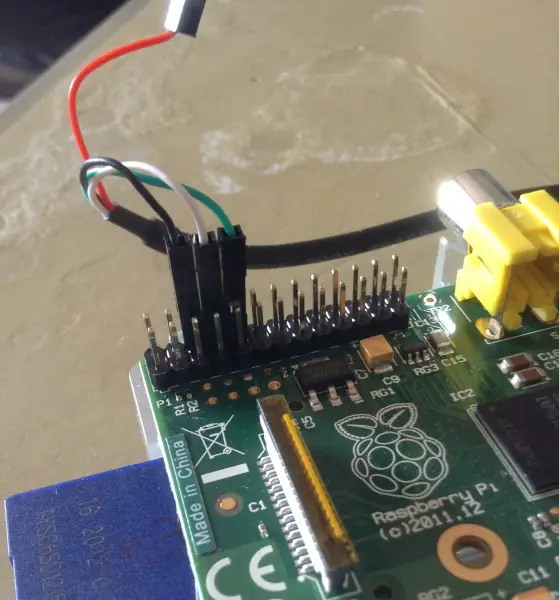
Now, we connect the “black”, “white” and “green” wires as shown in below image,

To enable serial console, from RPi3 we need change the boot/config.txt from the first partition of the SD card, hence Edit boot/config.txt and append line “enable_uart=1” at the end of the file. Connect SD card to RPi.
Connect Serial to USB cable to ubuntu laptop/desktop and type “dmesg” command on terminal as,
 $ dmesg
[15249.916424] usb 6-2: new full-speed USB device number 2 using uhci_hcd
[15250.073727] usb 6-2: New USB device found, idVendor=067b, idProduct=2303
[15250.073740] usb 6-2: New USB device strings: Mfr=1, Product=2, SerialNumber=0
[15250.073748] usb 6-2: Product: USB-Serial Controller
[15250.073754] usb 6-2: Manufacturer: Prolific Technology Inc.
[15251.849594] usbcore: registered new interface driver usbserial
[15251.849614] usbcore: registered new interface driver usbserial_generic
[15251.849629] usbserial: USB Serial support registered for generic
[15251.861018] usbcore: registered new interface driver pl2303
[15251.861038] usbserial: USB Serial support registered for pl2303
[15251.861063] pl2303 6-2:1.0: pl2303 converter detected
[15251.872688] usb 6-2: pl2303 converter now attached to ttyUSB0
This shows now that Serial to USB cable detected and created /dev/ttyUSB0 as device node. Now, lets start minicom on terminal as,
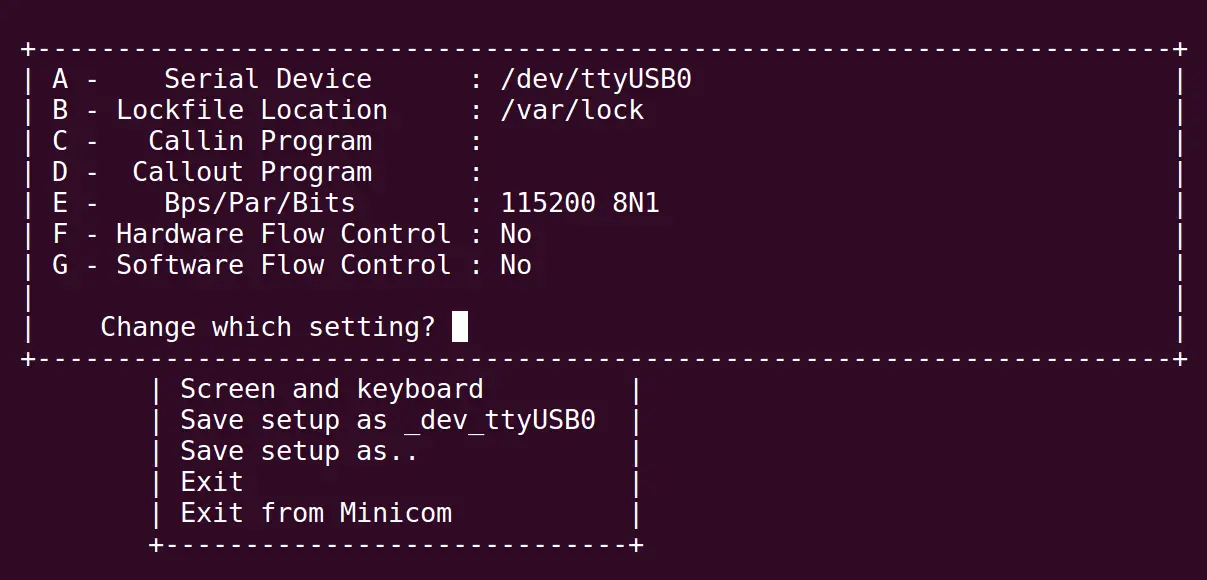
$ sudo minicom -s /dev/ttyUSB0One opened windows, goto “Serial Port Setup” and make the settings as below,

Once thats done, go to “Exit” and hit “Enter” key, so it will start minicom on /dev/ttyUSB0 port and will be ready to receive strings with below message,
Welcome to minicom 2.7

OPTIONS: I18n
Compiled on Feb  7 2016, 13:37:32.
Port /dev/ttyUSB0, 22:42:28

Press CTRL-A Z for help on special keys
Now connect the Power Cable to RPi, and you should see the booting messages flowing on minicom terminal. Enjoy !
Reference – https://cdn-learn.adafruit.com/downloads/pdf/adafruits-raspberry-pi-lesson-5-using-a-console-cable.pdf