Creating a bootable USB pen drive is a crucial step for installing Ubuntu on your computer. This process allows you to run Ubuntu directly from the USB drive, facilitating a clean installation or a trial run of the operating system. In this guide, we’ll walk you through the steps required to create a bootable USB drive for Ubuntu, ensuring a smooth and efficient installation process.
Table of Contents
- Prerequisites
- Download Ubuntu ISO File
- Choose a USB Drive
- Create Bootable USB Using Rufus (Windows)
- Create Bootable USB Using balenaEtcher (Windows, macOS, Linux)
- Create Bootable USB Using Startup Disk Creator (Ubuntu)
- Verify the Bootable USB
- Troubleshooting Common Issues
- Conclusion
Prerequisites
Before you start, ensure you have the following:
- A USB Pen Drive: At least 4GB of storage space is recommended, though 8GB or more is preferable.
- Ubuntu ISO File: Downloadable from the official Ubuntu website.
- A Computer: Running Windows, macOS, or Ubuntu.
- USB Burning Software: Tools like Rufus, balenaEtcher, or Startup Disk Creator.
Download Ubuntu ISO File
- Visit the Ubuntu Website: Go to the Ubuntu download page.
- Select the Version: Choose the version of Ubuntu you want to install (e.g., Ubuntu Desktop, Ubuntu Server).
- Download the ISO: Click the download link to save the ISO file to your computer.
Choose a USB Drive
- Insert the USB Drive: Plug your USB pen drive into a USB port on your computer.
- Backup Data: Ensure that any important data on the USB drive is backed up, as the process will erase all existing data.
Create Bootable USB Using Rufus (Windows)
- Download Rufus: Get Rufus from the official website.
- Open Rufus: Run the Rufus application.
- Select Device: Choose your USB drive from the device dropdown list.
- Select ISO File: Click the “Select” button and choose the Ubuntu ISO file you downloaded.
- Partition Scheme: Choose “MBR” for BIOS or UEFI, or “GPT” for UEFI only.
- Create the Bootable USB: Click “Start” and wait for Rufus to create the bootable USB drive.
Create Bootable USB Using balenaEtcher (Windows, macOS, Linux)
- Download balenaEtcher: Obtain balenaEtcher from the official website.
- Install and Open balenaEtcher: Follow the installation instructions for your operating system.
- Select Image: Click “Flash from file” and choose the Ubuntu ISO file.
- Select Target: Choose your USB drive from the list of available drives.
- Create the Bootable USB: Click “Flash!” and wait for the process to complete.
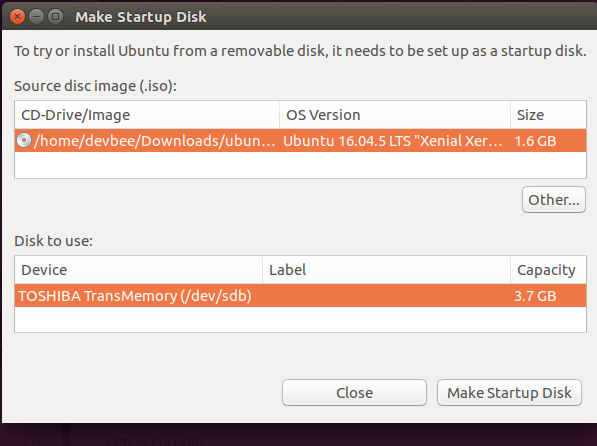
Create Bootable USB Using Startup Disk Creator (Ubuntu)
- Open Startup Disk Creator: Search for it in the Ubuntu application menu.
- Select Source: Click “Other” and choose the Ubuntu ISO file.
- Select Disk: Choose your USB drive from the list.
- Create the Bootable USB: Click “Make Startup Disk” and confirm to start the creation process.
Detailed steps are as here, connect the pen drive you want to format to create bootable disk to install Ubuntu. check in dmesg the device node created after connecting pendrive, this is just to make sure usb creator uses the right device node.
devbee@devbee:~/Desktop$ dmesg
[ 2396.372066] usb 2-2: new high-speed USB device number 2 using ehci-pci
[ 2399.299527] sd 6:0:0:0: [sdb] Assuming drive cache: write through
[ 2399.325106]  sdb: sdb1
[ 2399.328776] sd 6:0:0:0: [sdb] Attached SCSI removable disk
[ 2404.515673] EXT4-fs (sdb1): 1 orphan inode deleted
[ 2404.515675] EXT4-fs (sdb1): recovery complete
[ 2404.552993] EXT4-fs (sdb1): mounted filesystem with ordered data mode. Opts: (null)
[ 2935.303552]  sdb: sdb1
dmesg shows the pendrive detected as /dev/sdb1, and also may get automounted by your existing ubuntu.
$ sudo usb-creator-gtk 
Verify the Bootable USB
- Check the USB Drive: Ensure that the USB drive contains the Ubuntu files.
- Test Boot: Restart your computer, enter the BIOS/UEFI settings, and set the USB drive as the primary boot device. Save changes and reboot to test if the system boots from the USB drive.
Troubleshooting Common Issues
- USB Drive Not Recognized: Ensure the USB drive is properly connected and formatted. Try using a different port or USB drive.
- Boot Errors: Recheck the steps to make sure the ISO file was correctly written to the USB drive. Consider redoing the process with a different USB burning tool.
- Corrupted Files: Verify the integrity of the Ubuntu ISO file by comparing its checksum with the value provided on the Ubuntu website.
Conclusion
Creating a bootable USB pen drive for Ubuntu is a straightforward process that enables you to install or test Ubuntu with ease. By following the steps outlined above, you can ensure a successful and efficient installation experience. Whether you’re using Rufus, balenaEtcher, or Startup Disk Creator, having a bootable USB drive will make setting up Ubuntu a breeze.
