Website speed is a critical factor in user experience and search engine rankings. One effective way to enhance your website’s performance is through browser caching. Browser caching allows your site’s assets (like images, scripts, and stylesheets) to be stored locally on a user’s device, reducing load times for subsequent visits. In this guide, we’ll explore how browser caching works and provide a step-by-step approach to implementing it on your website to improve speed and efficiency.
Table of Contents
- Configuring Cache Expiration
- Testing and Verifying Browser Caching
- Troubleshooting Common Issues
- Conclusion
What is Browser Caching?
Browser caching is a technique where the browser stores copies of files from a website on a user’s device. When the user revisits the site, the browser can load these files from the local cache instead of downloading them again from the server. This reduces the amount of data transferred and speeds up page load times.
Why is Browser Caching Important?
- Improves Load Times: Cached resources load faster, enhancing user experience and reducing bounce rates.
- Reduces Server Load: Decreases the number of requests sent to the server, which can help manage server load and bandwidth.
- Enhances User Experience: Provides a smoother browsing experience with faster page loading.
- Boosts SEO: Faster websites are favored by search engines, potentially improving your site’s ranking.
Analyzing your websites speed using gtmetrix, Visit https://gtmetrix.com/leverage-browser-caching.html and enter your website url and click on “Analyze”
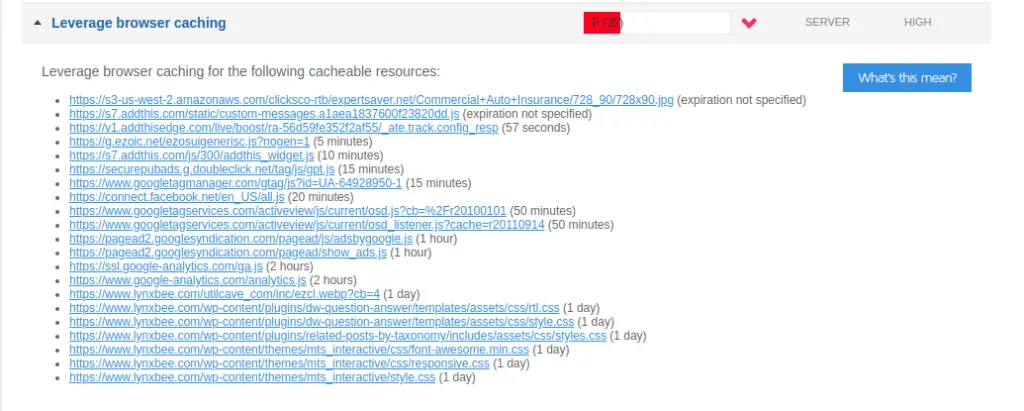
GTMetrix will show in report whether you are already using browser cache or not and also lot of other issues if any. When we analyzed our this website first time, gtmetrix report shown us that we were not using browser cache as seen in below report,

How to Enable Browser Caching
Leverage benefits of browser caching by modifying .htaccess
Note: for modifying .htaccess file you will need access to your website’s FTP since the .htaccess file resides in top of your websites directory structure.
Append following lines to your existing .htaccess and upload back to the website.
Using .htaccess File (Apache)
- Access Your .htaccess File: Locate the
.htaccessfile in your website’s root directory. If it doesn’t exist, create one. - Add Cache Control Rules: Insert the following code to enable caching for various file types:
<IfModule mod_expires.c>
  ExpiresActive on

# Perhaps better to whitelist expires rules? Perhaps.
  ExpiresDefault                          "access plus 1 month"

# cache.appcache needs re-requests in FF 3.6 (thanks Remy ~Introducing HTML5)
  ExpiresByType text/cache-manifest       "access plus 0 seconds"

# Your document html
  ExpiresByType text/html                 "access plus 0 seconds"

# Data
  ExpiresByType text/xml                  "access plus 0 seconds"
  ExpiresByType application/xml           "access plus 0 seconds"
  ExpiresByType application/json          "access plus 0 seconds"

# RSS feed
  ExpiresByType application/rss+xml       "access plus 1 hour"

# Favicon (cannot be renamed)
  ExpiresByType image/x-icon              "access plus 1 week"

# Media: images, video, audio
  ExpiresByType image/gif                 "access plus 1 month"
  ExpiresByType image/png                 "access plus 1 month"
  ExpiresByType image/jpg                 "access plus 1 month"
  ExpiresByType image/jpeg                "access plus 1 month"
  ExpiresByType video/ogg                 "access plus 1 month"
  ExpiresByType audio/ogg                 "access plus 1 month"
  ExpiresByType video/mp4                 "access plus 1 month"
  ExpiresByType video/webm                "access plus 1 month"

  ExpiresByType text/x-component          "access plus 1 month"

# Webfonts
  ExpiresByType font/truetype             "access plus 1 month"
  ExpiresByType font/opentype             "access plus 1 month"
  ExpiresByType application/x-font-woff   "access plus 1 month"
  ExpiresByType image/svg+xml             "access plus 1 month"
  ExpiresByType application/vnd.ms-fontobject "access plus 1 month"

# CSS and JavaScript
  ExpiresByType text/css                  "access plus 1 year"
  ExpiresByType text/javascript "access plus 1 year"
  ExpiresByType text/x-javascript "access plus 1 year"
  ExpiresByType application/javascript "access plus 1 year"
  ExpiresByType application/x-javascript "access plus 1 year"

  <IfModule mod_headers.c>
    Header append Cache-Control "public"
  </IfModule>

</IfModule>- Save and Upload: Save the changes and upload the
.htaccessfile back to your server.
Using Nginx Configuration
- Access Nginx Configuration: Open your Nginx configuration file (usually found in
/etc/nginx/nginx.confor/etc/nginx/sites-available/). - Add Cache Control Headers: Include the following code in the appropriate
serverblock:
   location ~* \.(jpg|jpeg|png|gif|css|js)$ {
       expires 1y;
       add_header Cache-Control "public, must-revalidate, proxy-revalidate";
}- Reload Nginx: Apply the changes by reloading Nginx with
sudo systemctl reload nginx.
Using CDN Services
- Choose a CDN: Sign up for a Content Delivery Network (CDN) service like Cloudflare or Akamai.
- Configure Caching Rules: Set up caching rules through the CDN’s dashboard to cache static assets and improve load times.
- Deploy CDN: Follow the CDN provider’s instructions to deploy and integrate it with your website.
Configuring Cache Expiration
- Set Expiration Times: Configure the expiration time for different file types to control how long they are cached. For example, images can be cached for a year, while HTML files might be cached for a shorter period.
- Review Cache Control Headers: Ensure cache control headers are properly set to avoid unnecessary revalidation or updates.
Testing and Verifying Browser Caching
- Use Browser Developer Tools: Open your browser’s developer tools (usually found in the F12 or right-click menu) and check the Network tab. Verify that cached resources are being loaded from the cache.
- Use Online Tools: Tools like Google PageSpeed Insights or GTmetrix can analyze your site’s caching performance and provide recommendations.
- Monitor Performance: Track your site’s load times and server response to ensure caching is functioning as expected.
Troubleshooting Common Issues
- Caching Not Working: Ensure that cache control rules are correctly implemented and that your server configuration is properly updated.
- Incorrect Expiration Times: Double-check the expiration times set in your configuration files to ensure they are appropriate for each resource type.
- Cache Invalidation: Clear the cache and reload your website to test changes. Ensure that updated content is correctly served after cache expiration.
Conclusion
Implementing browser caching is a vital step in improving your website’s speed and performance. By configuring caching rules for your server or CDN, you can significantly reduce load times, enhance user experience, and potentially boost your SEO rankings. Regularly review and test your caching setup to ensure optimal performance and address any issues promptly.