We need to compile recent qemu source code since it has added support for Raspberry Pi, to do that, follow below steps,
$ mkdir workspace$ cd workspace$ git clone --recursive git://git.qemu-project.org/qemu.git$ cd qemu$ mkdir build$ cd build$ ../configure$ make$ cd workspaceYou can download the latest Raspbian image from http://ftp.jaist.ac.jp/pub/raspberrypi/raspbian_lite/images/
$ wget -c http://ftp.jaist.ac.jp/pub/raspberrypi/raspbian_lite/images/raspbian_lite-2020-02-14/2020-02-13-raspbian-buster-lite.zip$ unzip 2020-02-13-raspbian-buster-lite.zip Above command will create 2020-02-13-raspbian-buster-lite.img
Now, lets copy kernel image, dtb and command line information from the first partition of the 2020-02-13-raspbian-buster-lite.img as,
$ fdisk -l 2020-02-13-raspbian-buster-lite.img
Disk 2020-02-13-raspbian-buster-lite.img: 1.74 GiB, 1849688064 bytes, 3612672 sectors
Units: sectors of 1 * 512 = 512 bytes
Sector size (logical/physical): 512 bytes / 512 bytes
I/O size (minimum/optimal): 512 bytes / 512 bytes
Disklabel type: dos
Disk identifier: 0x738a4d67

Device                               Boot  Start     End Sectors  Size Id Type
2020-02-13-raspbian-buster-lite.img1        8192  532479  524288  256M  c W95 FAT32 (LBA)
2020-02-13-raspbian-buster-lite.img2      532480 3612671 3080192  1.5G 83 Linux
$ mkdir /tmp/rpi$ sudo mount ./2020-02-13-raspbian-buster-lite.img /tmp/rpi/ -oloop,offset=$((8192*512))With above command, you can see we are able to mount the Raspbian filesystem on /mnt/tmp folder, so we can copy the contents inside to our machine as,
$ mkdir binaries
$ cd binaries
$  cp -f /tmp/rpi/{kernel7.img,bcm2709-rpi-2-b.dtb,cmdline.txt} .
Now, you can unmount the Raspbian filesystem.
$ sudo umount /tmp/rpiNow, we can use below command to run the QEMU with the Raspberry Pi binaries so as we can emulate the Raspberry Pi on our machine.
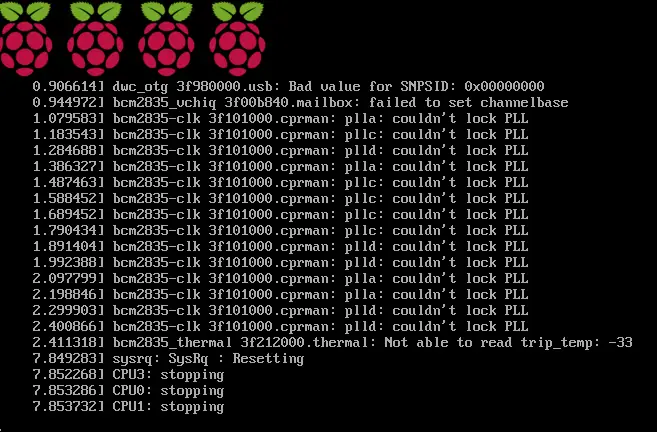
qemu-system-arm -M raspi2 -kernel ./kernel7.img -dtb ./bcm2709-rpi-2-b.dtb -sd ./2020-02-13-raspbian-buster-lite.img -serial stdio -append "$(<cmdline.txt)"The kernel may possibly fail to reset, so when it prints sysrq: SysRq: Resetting, like as shown in below image just kill QEMU via Ctrl+C or closing its window.

Mount the image again and copy the updated command line cmdline.txt file as,
$ sudo mount ./2020-02-13-raspbian-buster-lite.img /tmp/rpi/ -oloop,offset=$((8192*512)) $ cp -r /tmp/rpi/cmdline.txt .Now you can run the QEMU again using above comamnd,
$ qemu-system-arm -M raspi2 -kernel ./kernel7.img -dtb ./bcm2709-rpi-2-b.dtb -sd ./2020-02-13-raspbian-buster-lite.img -serial stdio -append "$(<cmdline.txt)"But with this still, you will get a Login prompt on UI but you wont be able to enter username and password due to some limitations of RPi QEMU, to resolve this we will get the console on your machines terminal, so you need to change cmdline.txt as, ( add console=ttyAM0 and -serial stdio )
console=serial0,115200 console=ttyAMA0 root=PARTUUID=738a4d67-02 rootfstype=ext4 elevator=deadline fsck.repair=yes rootwait -serial stdioNow, if you start again the qemu, you can see the console logs on your machine terminal and can type username “pi” and password “raspberry” which are default Raspbian username and password.
Now cross compile the helloworld program which we can copy to the root filesystem as,
$ vim helloworld.c#include <stdio.h>
int main(int argc, char **argv) {
printf("hello world\n");
return 0;
}Now, lets try to understand cross compilation i.e. compile on x86 which will generate binary for ARM and to run on ARM.
for this, we need set of tools which are called as cross compiler or standard word is “toolchain” which helps to compile for ARM on x86 as,
$ git clone https://github.com/raspberrypi/tools --depth 1 $ cd tools$ git branch
* masterexport toolchain path
$ export PATH=$PATH:/home/myuser/rpi/tools/arm-bcm2708/arm-bcm2708-linux-gnueabi/bin $ arm-bcm2708-linux-gnueabi-gcc -o helloworld helloworld.chere, as we see, for native compilation we have used only gcc, but for cross compilation we have to use arm-bcm2708-linux-gnueabi-gcc i.e. cross gcc.
Now, if we check, how output binary is generated, we will see as,
 $ file helloworld
helloworld: ELF 32-bit LSB executable, ARM, EABI5 version 1 (SYSV), dynamically linked, interpreter /lib/ld-linux.so.3, for GNU/Linux 3.1.9, not stripped
Now we will copy this cross compiled binary on RPi qemu as,
$ fdisk -l 2017-07-05-raspbian-jessie-lite.img
Disk 2017-07-05-raspbian-jessie-lite.img: 2 GiB, 2147483648 bytes, 4194304 sectors
Units: sectors of 1 * 512 = 512 bytes
Sector size (logical/physical): 512 bytes / 512 bytes
I/O size (minimum/optimal): 512 bytes / 512 bytes
Disklabel type: dos
Disk identifier: 0x007c305b

Device                               Boot Start     End Sectors  Size Id Type
2017-07-05-raspbian-jessie-lite.img1       8192   93596   85405 41.7M  c W95 FAT32 (LBA)
2017-07-05-raspbian-jessie-lite.img2      94208 4194303 4100096    2G 83 Linux
$ sudo mkdir /mnt/tmp$ sudo mount ./2017-07-05-raspbian-jessie-lite.img /mnt/tmp/ -oloop,offset=$((94208*512))Here, we are mounting second partition of Rpi image 2017-07-05-raspbian-jessie-lite.img so that we can copy our cross compiled binary into Rpi root filesystem, for this important to note is, the start offset for second partition of image 2017-07-05-raspbian-jessie-lite.img2 (94208 in our case) should be same used in “offset” of mount command as shown in bold above,
$ sudo cp helloworld /mnt/tmp/home/pi/$ sudo umount /mnt/tmp$ /home/myuser/rpi/qemu/qemu/build/arm-softmmu/qemu-system-arm -M raspi2 -kernel ./kernel7.img \
-dtb ./bcm2709-rpi-2-b.dtb -sd ./2017-07-05-raspbian-jessie-lite.img \
-serial stdio \
-append "$(<cmdline.txt)"Now, this will boot Rpi and on shell you will get console, type “pi” as username & “raspberry” as password to get RPi console,
and on Rpi console, you can go to /home/pi and run the helloworld binary we compiled.
